libGDX 游戏引擎渲染3d

logo
作为一个java开发,还是java用得顺手
按照前面的学习,试着学习用LibGDX封装好的API来渲染一个3d物体,同时分析libgdx封装的3d渲染源码

Libgdx

LibGDX游戏引擎的基本使用参考这里。
引擎中,关于3d的渲染部分,全部在com.badlogic.gdx.graphics.g3d包中,把很多OpenGL底层操作全部封装了,所以,如果我们想要直接看到libGDX渲染3d的功能效果,还是很方便的.其中有几个概念,是libGDX封装便于操作的:

代码

1
2
3
4
5
6
7
8
9
10
11
12
13
14
15
16
17
18
19
20
21
22
23
24
25
26
27
28
29
30
31
32
33
34
35
36
37
38
39
40
41
42
43
44
45
46
47
48
49
50
51
52
53
54
55
56
57
58
59
60
61
62
63
64
65
66
67
68
69
70
71
72
73
74
75
76
77
78
79
80
81
82
83
84
85
86
87
88
89
90
91
92
93
94
95
96
97
98
99
100
101
102
103
104
105
106
107
108
109
110
111
112
113
114
115
116
117
118
119
120
121
122
123
124
125
126
127
128
129
130
131
132
133
134
135
136
137
138
139
140
141
142
143
144
145
146
147
148
149
150
151
152
153
154
155
156
157
158
159
160
161
162
163
164
165
166
167
168
169
170
171
package com.voidvvv.test;

import com.badlogic.gdx.Game;
import com.badlogic.gdx.Gdx;
import com.badlogic.gdx.Input;
import com.badlogic.gdx.graphics.*;
import com.badlogic.gdx.graphics.g3d.*;
import com.badlogic.gdx.graphics.g3d.attributes.ColorAttribute;
import com.badlogic.gdx.graphics.g3d.attributes.TextureAttribute;
import com.badlogic.gdx.graphics.g3d.model.MeshPart;
import com.badlogic.gdx.graphics.g3d.model.Node;
import com.badlogic.gdx.graphics.g3d.model.NodePart;
import com.badlogic.gdx.graphics.g3d.model.data.ModelNodePart;
import com.badlogic.gdx.graphics.g3d.utils.CameraInputController;
import com.badlogic.gdx.graphics.g3d.utils.ModelBuilder;
import com.badlogic.gdx.graphics.glutils.IndexArray;
import com.badlogic.gdx.graphics.glutils.IndexData;
import com.badlogic.gdx.graphics.glutils.VertexArray;
import com.badlogic.gdx.graphics.glutils.VertexData;
import com.badlogic.gdx.math.Matrix4;
import com.badlogic.gdx.math.Vector3;
import com.badlogic.gdx.utils.Array;
import com.badlogic.gdx.utils.ScreenUtils;

public class MyGame extends Game {
Model model;
ModelBatch modelBatch;
ModelInstance demo;
PerspectiveCamera camera;
float[] vertex = {
// 第一个面
0.f, 0f, 0f, 0, 0,
0.f, 10f, 0f, 0, 1,
10.f, 10f, 0f, 1, 1,

10.f, 10f, 0f, 1, 1,
10.f, 0.f, 0f, 1, 0,
0.f, 0f, 0f, 0, 0,
// 第二个面
0, 10, 0, 0, 0,
0, 10, 10, 0, 1,
10, 10, 10, 1, 1,

10, 10, 10, 1, 1,
10, 10, 0, 1, 0,
0, 10, 0, 0, 0,
// 第三个面
10, 0, 10, 0, 0,
10, 10, 10, 0, 1,
0, 10, 10, 1, 1,

0, 10, 10, 1, 1,
0, 0, 10, 1, 0,
10, 0, 10, 0, 0,
// 第四个面
0.f, 0f, 0f, 0, 0,
10, 0, 0, 0, 1,
10, 0, 10, 1, 1,

10, 0, 10, 1, 1,
0, 0, 10, 1, 0,
0.f, 0f, 0f, 0, 0,
// 第五个面 需要注意,颜色渲染是在逆时针方向展示的,如果把这个面冲着立方体里面,那么外面看就是空白的
10, 10, 10, 1, 1,
10, 0, 10, 0, 1,
10, 0, 0, 0, 0,


10f, 0f, 0f, 0, 0,
10, 10, 0, 1, 0,
10, 10, 10, 1, 1,


// 第六个面
0, 0, 0, 0, 0,
0, 0, 10, 0, 1,
0, 10, 10, 1, 1,

0, 10, 10, 1, 1,
0, 10, 0, 1, 0,
0, 0f, 0f, 0, 0,
};

Color[] colors = {
Color.BLACK,
Color.WHITE,
Color.BLUE,
Color.CHARTREUSE,
Color.YELLOW,
Color.FIREBRICK,
};

CameraInputController cameraInputController;

@Override
public void create() {


System.out.println(vertex.length);
camera = new PerspectiveCamera(67, Gdx.graphics.getWidth(), Gdx.graphics.getHeight());
modelBatch = new ModelBatch();
VertexAttribute positionAtt = VertexAttribute.Position();
// VertexAttribute colorAtt = VertexAttribute.ColorUnpacked();
VertexAttribute texCorrAtt = VertexAttribute.TexCoords(0);

model = new Model();
Mesh mesh = new Mesh(true, 36, 0, positionAtt, texCorrAtt);
mesh.setVertices(vertex);
// mesh.setIndices();
// mesh.setInstanceData()

Node n1 = new Node();

TextureAttribute ta = TextureAttribute.createDiffuse(new Texture("badlogic.jpg"));
TextureAttribute ta2 = TextureAttribute.createDiffuse(new Texture(Gdx.files.absolute("C:\\Users\\voidvvv\\Pictures\\asset\\enhancer_profile.png")));

for (int i = 0; i<6; i++){
NodePart nodePart = nodePart_(mesh, 6 * i, colors[i], ta ,ta2 );

n1.parts.add(nodePart);
System.out.println("i: " + i);
}
model.meshes.add(mesh);
model.nodes.add(n1);

demo = new ModelInstance(model);
// demo.transform.scl(1.f).translate(0,0,0);

camera.position.set(5,6,-20);
camera.lookAt(5,5,5);
cameraInputController = new CameraInputController(camera);
Gdx.input.setInputProcessor(cameraInputController);
}

static NodePart nodePart_(Mesh mesh, int offset, Color color, TextureAttribute ta , TextureAttribute ta2) {
MeshPart mp = new MeshPart();
mp.primitiveType = GL30.GL_TRIANGLES;
mp.mesh = mesh;
mp.offset = offset;
mp.size = 6;

NodePart np = new NodePart(mp, new Material(ColorAttribute.createDiffuse(color),ta , ta2));
np.meshPart = mp;
return np;
}
Vector3 tmp = new Vector3();
@Override
public void render() {
camera.update();
Gdx.gl.glClearColor(Color.GRAY.r,Color.GRAY.g,Color.GRAY.b,Color.GRAY.a);
Gdx.gl.glClear(GL20.GL_COLOR_BUFFER_BIT | GL20.GL_DEPTH_BUFFER_BIT);

Gdx.gl.glViewport(0, 0, Gdx.graphics.getWidth(), Gdx.graphics.getHeight());
cameraInputController.update();;
if (Gdx.input.isKeyPressed(Input.Keys.SPACE)){

camera.position.set(5,6,-20);
camera.lookAt(5,5,5);
camera.up.set(0,0,1);
}

// demo.transform.rotate(tmp.set(1,1,1),1.5f);

modelBatch.begin(camera);
Gdx.gl.glEnable(GL20.GL_DEPTH_TEST);

modelBatch.render(demo);
modelBatch.end();
}
}

代码使用libgdx内置的moedel类型构建了一个方块原型,设置了vertex顶点数组,给model添加了node,然后node下面添加了一个node part作为渲染对象。
最后,使用model构建出modelinstatnce,使用model batch对modelInstance渲染。

Model

openGL中,若我们想渲染3d物体,需要一下计算公式:
2024-03-09T225319 我们的Model类就是为了获取Local向量而来的。

Model是一个3d物体的原型。用来表示物体本来的样子。
我们这里的Model类,存储的是上面Local的内容,可以看到,本质是个向量。我们可以看下其源码:

1
2
3
4
5
6
7
8
9
10
11
12
13
14
15
16
17
18
19
20
21
22
23
24
25
26
27
28
29
30
31
32
33
34
35
36
37
38
39
40
41
42
43
44
45
46
47
48
49
50
51
52
53
package com.badlogic.gdx.graphics.g3d;


/** A model represents a 3D assets. It stores a hierarchy of nodes. A node has a transform and optionally a graphical part in form
* of a {@link MeshPart} and {@link Material}. Mesh parts reference subsets of vertices in one of the meshes of the model.
* Animations can be applied to nodes, to modify their transform (translation, rotation, scale) over time.
* </p>
*
* A model can be rendered by creating a {@link ModelInstance} from it. That instance has an additional transform to position the
* model in the world, and allows modification of materials and nodes without destroying the original model. The original model is
* the owner of any meshes and textures, all instances created from the model share these resources. Disposing the model will
* automatically make all instances invalid!
* </p>
*
* A model is created from {@link ModelData}, which in turn is loaded by a {@link ModelLoader}.
*
* @author badlogic, xoppa */
public class Model implements Disposable {
/** the materials of the model, used by nodes that have a graphical representation FIXME not sure if superfluous, allows
* modification of materials without having to traverse the nodes **/
public final Array<Material> materials = new Array();
/** root nodes of the model **/
public final Array<Node> nodes = new Array();
/** animations of the model, modifying node transformations **/
public final Array<Animation> animations = new Array();
/** the meshes of the model **/
public final Array<Mesh> meshes = new Array();
/** parts of meshes, used by nodes that have a graphical representation FIXME not sure if superfluous, stored in Nodes as well,
* could be useful to create bullet meshes **/
public final Array<MeshPart> meshParts = new Array();
/** Array of disposable resources like textures or meshes the Model is responsible for disposing **/
protected final Array<Disposable> disposables = new Array();

/** Constructs an empty model. Manual created models do not manage their resources by default. Use
* {@link #manageDisposable(Disposable)} to add resources to be managed by this model. */
public Model () {
}

/** Constructs a new Model based on the {@link ModelData}. Texture files will be loaded from the internal file storage via an
* {@link FileTextureProvider}.
* @param modelData the {@link ModelData} got from e.g. {@link ModelLoader} */
public Model (ModelData modelData) {
this(modelData, new FileTextureProvider());
}

/** Constructs a new Model based on the {@link ModelData}.
* @param modelData the {@link ModelData} got from e.g. {@link ModelLoader}
* @param textureProvider the {@link TextureProvider} to use for loading the textures */
public Model (ModelData modelData, TextureProvider textureProvider) {
load(modelData, textureProvider);
}
...
}

里面存储的内容有 materials(材质),nodes 节点(后面会介绍),Animation 变化动画,Mesh 网格节点。

Model下面层级的关系有点类似:
2024-03-10T095248
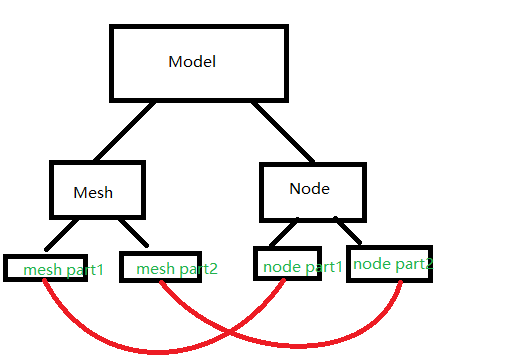
nodepart 包含 mesh part

materials

材质,可以理解为我们的3d物体外表是什么样子的,常见的设置比如颜色,图片等等。

node 节点

我们的Model存储了很多的node节点,model本身没有local位置信息,只有一些物体原型数据。
而我们的Node节点,就存储了我们物体的model矩阵信息。可以看源码:

1
2
3
4
5
6
7
8
9
10
11
12
13
14
15
16
17
18
19
20
21
22
23
24
25
26
27
28
29
30
31
32
33
34

package com.badlogic.gdx.graphics.g3d.model;


/** A node is part of a hierarchy of Nodes in a {@link Model}. A Node encodes a transform relative to its parents. A Node can have
* child nodes. Optionally a node can specify a {@link MeshPart} and a {@link Material} to be applied to the mesh part.
* @author badlogic */
public class Node {
/** the id, may be null, FIXME is this unique? **/
public String id;
/** Whether this node should inherit the transformation of its parent node, defaults to true. When this flag is false the value
* of {@link #globalTransform} will be the same as the value of {@link #localTransform} causing the transform to be independent
* of its parent transform. */
public boolean inheritTransform = true;
/** Whether this node is currently being animated, if so the translation, rotation and scale values are not used. */
public boolean isAnimated;
/** the translation, relative to the parent, not modified by animations **/
public final Vector3 translation = new Vector3();
/** the rotation, relative to the parent, not modified by animations **/
public final Quaternion rotation = new Quaternion(0, 0, 0, 1);
/** the scale, relative to the parent, not modified by animations **/
public final Vector3 scale = new Vector3(1, 1, 1);
/** the local transform, based on translation/rotation/scale ({@link #calculateLocalTransform()}) or any applied animation **/
public final Matrix4 localTransform = new Matrix4();
/** the global transform, product of local transform and transform of the parent node, calculated via
* {@link #calculateWorldTransform()} **/
public final Matrix4 globalTransform = new Matrix4();

public Array<NodePart> parts = new Array<NodePart>(2);

protected Node parent;
private final Array<Node> children = new Array<Node>(2);

}

可以看到我们的node节点里的的确确定义了transition 位移,rotation 旋转,scale 缩放等矩阵信息。
我们的model存储了一系列的node集合,每一个node都有自己的local矩阵,这样可以更好更方便的批量渲染我们的数据。

类比的话,我个人觉得model就像一个人,而node就像人体上的四肢。每个人的四肢长短大小不一,这样就是model下面的node存在的意义。但在代码层面,我个人人为仅仅是方便我们使用而已

NodePart

NodePart是Node下面更子一级的东西。我们已经知道,node节点已经存储了local矩阵信息,但是我们还需要知道我们物体原本的顶点数组,这样我们才能知道怎么渲染这个物体。
Nodepart就是node下面一系列包含顶点数组的类的集合。就好比我们的手是跟着胳膊动的,但是我们手上分别有五个手指,是各自的样子。
NodePart下面包含 material材质,MeshPart 网格部分数据,
材质比较好理解,我们node下面的每一个part都可能有不同的渲染需求,比如一个立方体,每一个面都想渲染不同颜色。
MeshPart,顾名思义,是Mesh的一部分,这个类里面存放着的是Mesh网格数据,以及当前noded part所需要这个网格的区域,用offset和size标识。

Mesh

Mesh网格,这里面存放的就是我们的顶点数组,还有索引数组。一个model可以有许多mesh,可以分给不同的node(node part)来读取渲染。

render

渲染这部分,底层就是OpenGL,使用shader,渲染顶点数组对象。但是Libgdx封装了很多实用的功能,所以我决定从源码开始看.

ModelBatch

ModelBatch 是libgdx为我们准备的渲染3d物体的一个批处理器。想要获取它的对象非常简单,我们可以直接new。
我们可以看到这个类有一些render方法,render方法有非常多的重载,我只想来详细看下这个render方法:

1
2
3
4
5
6
7
8
9
// 因为了解这个方法就足以了解别的render方法了
public void render (final RenderableProvider renderableProvider) {
final int offset = renderables.size;
renderableProvider.getRenderables(renderables, renderablesPool);
for (int i = offset; i < renderables.size; i++) {
Renderable renderable = renderables.get(i);
renderable.shader = shaderProvider.getShader(renderable);
}
}

这个方法做了以下几件事:

  1. 方法需要传入一个RenderableProvider
  2. 使用传入的RenderableProvider,配合本身内部的renderablesPool对象池,生成renderable对象放在我们当前的batch类中
  3. 遍历所有renderable对象,为其设置shader

其中,RenderableProvider是一个接口。接口中只有一个抽象方法:

1
public void getRenderables (Array<Renderable> renderables, Pool<Renderable> pool);

我们看一下它的其中一个实现类:ModelInstance的实现

1
2
3
4
5
public void getRenderables (Array<Renderable> renderables, Pool<Renderable> pool) {
for (Node node : nodes) {
getRenderables(node, renderables, pool);
}
}

这里可以看到就是把当前model实例中的node全部拿来遍历,然后为每个node生成renderable。再往下:

1
2
3
4
5
6
7
8
9
10
11
protected void getRenderables (Node node, Array<Renderable> renderables, Pool<Renderable> pool) {
if (node.parts.size > 0) {
for (NodePart nodePart : node.parts) {
if (nodePart.enabled) renderables.add(getRenderable(pool.obtain(), node, nodePart));
}
}

for (Node child : node.getChildren()) {
getRenderables(child, renderables, pool);
}
}

对于当前node下的每一个node part,都会从我们的rederable对象池中获取一个renderable,作为其真正的到渲染物。
然后,每一个node part会把自身包含的material以及mesh part 绑定到这个renderable中,来进行渲染。

最后真正的渲染方法,在:

1
modelBatch.end();

end方法就是结束一个批次,来将之前生成的所有renderable来用对应的shader进行渲染。

嗯,就先这样把